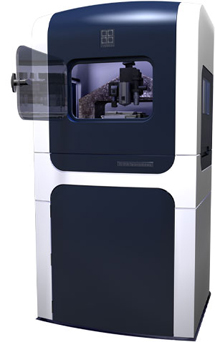
World’s Most Comprehensive and Quantitative Nanomechanical Test Instrument
The Hysitron TI 950 TriboIndenter is an automated, high-throughput nanomechanical testing instrument.
- Extremely versatile – The full suite of Hysitron testing techniques is available to you, with new methods continuously in development.
- High throughput – Automated sample staging and testing routines.
- In-situ SPM imaging – Precise test positioning accuracy and fast observation of post-test deformation behaviour.
Hysitron’s performech® Advanced Control Module greatly enhances the precision of feedback-controlled nanomechanical testing, provides dual head testing for nano-scale and micro-scale connectivity and delivers unprecedented noise floor performance.

Standard Testing Modes
• Quasistatic nanoindentation – Measure Young’s modulus, hardness, fracture toughness and other mechanical properties
• Scratch testing – Quantify scratch resistance, critical delamination forces and friction coefficients with simultaneous normal and lateral force and displacement monitoring
• Top-down optics – High resolution, colour CCD camera for individual structure identification and coarse test positioning
• SPM imaging – In-situ imaging using an indenter tip for nanometer precision test positioning and surface topography information
• ScanningWear™ – Observe and quantify wear volumes and wear rates using in-situ imaging
• Feedback control – Operate in closed loop load or displacement control for superior nanoindentation and creep and stress relaxation studies
Combine with Raman Spectroscopy
The TI 950 can be coupled to the Renishaw inVia Raman microscope, to combine nanoindentation with Raman spectroscopy for correlated chemical and mechanical information and new insights into your material’s properties – more info…
Upgrade Options
[custom_table style=”1″]
| nanoDMA® III | Investigate time-dependent properties of materials using a dynamic testing technique designed specifically for polymers and biomaterials. | More info |
| Modulus Mapping™ | Obtain quantitative maps of the storage and loss stiffness and moduli from a single SPM scan | More info |
| Closed-loop Scanner | Increased scan range (100 μm × 100 μm × 15 μm) and superior test placement accuracy and stability | More info |
| AFM Imaging | Ultra-low contact force and intermittent contact imaging for surface topography and selection of test locations on soft polymer and biomaterials | |
| 3D OmniProbe | Forces of up to 10 N and scratch lengths up to 150 mm for depth-sensing micro-indentation and tribological studies | More info |
| Thermal Control | Heating/cooling stages for investigating mechanical properties at non-ambient temperatures | xSol High Temperature Stage |
| Vacuum Sample Stage | Holds large, flat samples, eliminating interference from magnetic sample holders. Originally designed for the semiconductors and wafers. | More info |
| nanoECR® | Conductive nanoindentation system for simultaneaous in-situ electrical and mechanical measurements, for investigation of material deformation and stress-induced transformation behaviour | More info |
| TriboAE™ Acoustic Emission Testing | In-situ acoustic emission monitoring with quasistatic indentation for understanding the failure mechanics of brittle materials | More info |
| Fluorescence Microscopy | Test highly specific regions of inhomogeneous materials and hierarchical structures that cannot be identified using standard imaging techniques | More info |
| MultiRange NanoProbe™ | Increase load range up to 10 Newtons, for fracture and interfacial delamination studies | |
| TriboAnalysis™ | Advanced data analysis software | More info |
| TriboImage™ | Complete time-resolved nanoscale reciprocating wear | More info |
| xZ 500 Extended Displacement Stage | 500 μm displacement capability for soft polymers, gels, adhesive and compliant materials | More info |
[/custom_table]

