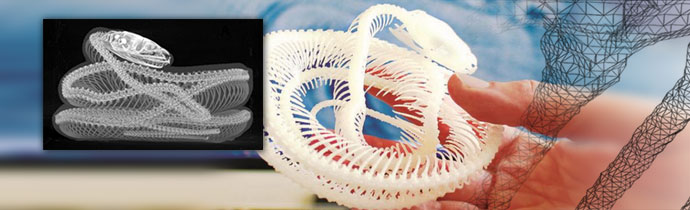
How to 3D Print a Micro-CT Scan
3D printing and X-ray micro-CT 3D imaging are obvious partners. 3D printing has become an affordable, mainstream technology. This post walks you through the process from scanning, reconstructing and binarising through meshing to 3D printing.
[alert type=”info” close=”false”]Workshop at ToScA 2017
Try out these techniques at our workshop on 6th September 2017! More details…
[/alert]
There are many useful, real-world applications for micro-CT and 3D printing, including:
- Customisation eg implants and reverse engineering, as presented at the Bruker microCT User Meeting 2010: “Advanced 3D Analysis of X-ray Computed Tomography Data”
- Research and education eg printing a scaled up model to examine components and their functionality, as presented at the Bruker microCT User Meeting 2014: “What’s inside a fishy suction cup?”
- Rapid prototyping and production
Here are the key steps of how to 3D print a micro-CT scan. A method note is available with more detailed information – please get in touch if you’d like a copy. Blue Scientific is the official UK supplier for the full range of Bruker micro-CT scanners, from entry-level scanners to highly advanced systems, and we are available to advise on the best scanner for your research:
Contact us on 01223 422 269 or info@blue-scientific.com
View the range of Micro-CT Scanners
[hr]How to 3D Print a Micro-CT Scan
1) Scan and Reconstruct
Control program + NRecon
The first step is the usual micro-CT scanning process. Scan the object as normal; It’s recommended not to choose the smallest pixel size, but the optimal one for the sample. In this case, more pixels generate larger datasets and models, and not necessarily better results.

Maximum intensity projection of the reconstructed slices
2) Binarise
CTAn
If the resolution of the scan is higher than required for the part to be printed, the dataset should be resized. Thresholding should then be carried out as usual. Image filters can be useful when thresholding. Next, the ROI (Region of Interest) is defined.
It is advisable to remove potential noise from the image, using despeckling and/or morphological tools in the software. This can have a great effect on the file size of the final 3D model.
3) Meshing
CTAn
A 3D model representing the surface of the binary object needs to be constructed. Typically this consists of polygonal elements (in this case triangles – see below) of which the vertices and normals are saved.
CTAnalyser (Bruker 3D data analysis software) outputs in commonly used 3D file types, including .stl and .ply. Check which file type is best for the 3D printer that you’ll be using.
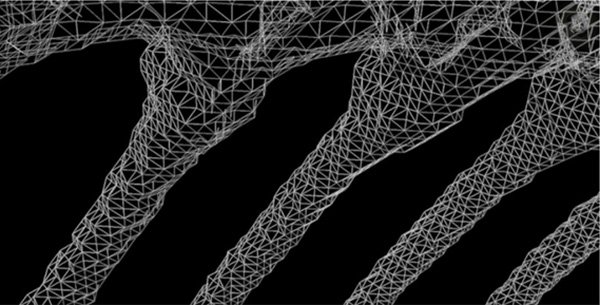
Close-up of the ribs, showing the triangular mesh
4) Inspection
CTVol
Before printing, inspect the mesh using CTVol, a surface rendering programme. Check that any thin structures are preserved well. For some models it may be necessary to repeat the binarisation and meshing steps.
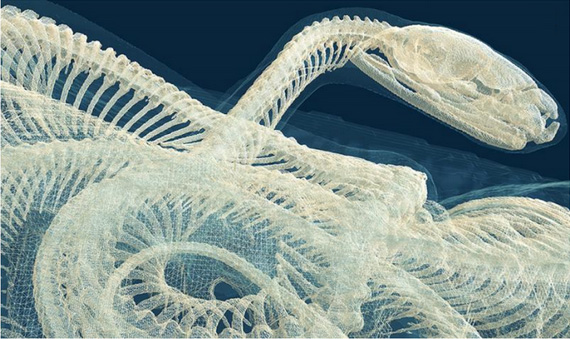
Surface render of the micro-CT model, using Bruker CTVol
5) 3D Printing
Import the model into the 3D printer software and rescale to the required size. Depending on the type of printer and its resolution, the printed parts may need to be cleaned and/or finished.
Contact us on 01223 422 269 or info@blue-scientific.com
View Micro-CT Scanners
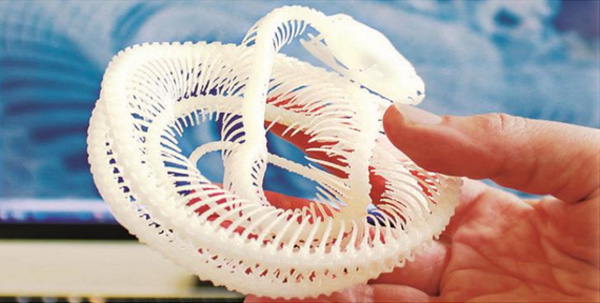
Final 3D print, created from the original micro-CT image