In Situ SPM for Nanomechanical and Nanotribological Characterisation
In-situ SPM (Scanning Probe Microscopy) uses the same probe to raster the sample surface for topography imaging and to conduct nanomechanical testing. This ensures test placement accuracy, as well as being quicker and easier. You can also observe material deformation behaviour immediately after the test.
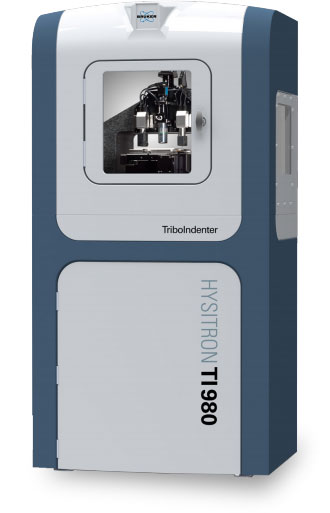
In-situ SPM is known as SPM+, a feature included as standard with the Bruker Hysitron TI 980 TriboIndenter, a nanomechanical and nanotribological testing system.
Blue Scientific is the official Nordic distributor of Bruker Hysitron standalone nanomechanical testing instruments (Norway, Finland, Iceland, Sweden and Denmark). For more information and quotes, please get in touch:
Bruker TI 980 TriboIndenter
Contact us on +44 (0)1223 422 269 or info@blue-scientific.com
In-Situ SPM Imaging
In-situ Scanning Probe Microscopy (SPM) imaging simultaneously combines:
- Nanomechanical and nanotribological characterisation
- High-resolution SPM imaging
The same probe is used to image the sample surface and for nanomechanical testing. Images are gathered on-site, without leaving the test location. This inherently increases accuracy, repeatability and speed compared to operating an AFM in parallel, which can often have issues with accurate positioning and correlation.
With Bruker Hysitron in-situ SPM (known as SPM+), the same length scale is used for the imaging resolution and the nanomechanical testing, which makes results much easier to interpret and compare. This gives you truly quantitative and accurate characterisation at the nanoscale.
Testing Process
First, pre-test SPM imaging measures the surface morphology (eg microstructure, topography, roughness) with nanometer resolution. This is important to avoid surface defects when testing.
Positioning accuracy is high precision ±10nm, making it easier to test multi-phase materials. Precision is also important when correlating microstructure (shape, size and domain distribution) with mechanical properties.
Post-test SPM imaging enables you to characterise material deformation behaviour (eg fracture or pile-up) and also to verify the test placement.

A) 5μm scan size, 512 x 512 resolution, topography image of a magnetic storage material. Indent placements circled in red. Individual grains have been selected for nanomechanical testing. B) 3D rendering of the magnetic storage medium. C) 10μm scan size, 1024 x 1024 resolution, gradient image of Inconel 625, a nickel-chromium alloy after indentation. Slip lines of the crystal structure can be seen surrounding the indent.
SPM+ Features
- Nanometer resolution for quantitative characterisation of pre-test surface morphology and post-test deformation behaviour
- High precision test placement accuracy of ±10nm
- Image samples with broad range of geometries and masses, with top-down, probe scanning architecture
- Suitable for soft materials and delicate surface structures, with 70nN imaging contact force
- Define your imaging resolution, from fast scans (64 x 64) to high resolution 4096 x 4096
- Customise rectangular scans for imaging high aspect ratio features with maximum pixel density, with resolutions up to 16384 x 512
How In-Situ SPM Works
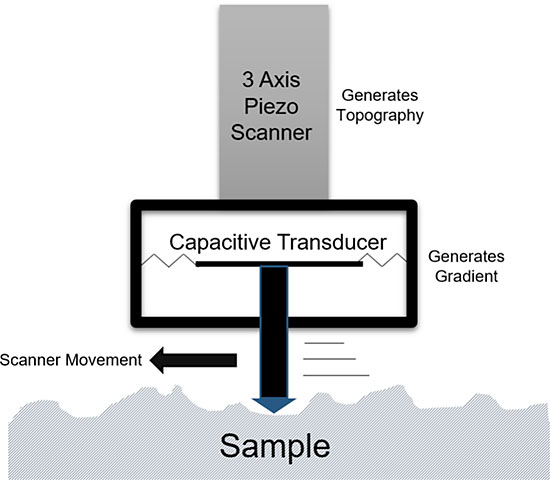
Motorised staging is used to bring the test probe (attached to the capacitive transducer) into contact with the sample surface. The contact force can be adjusted to suit your sample.
The probe-transducer combination is mounted on a high precision 3 axis tandem tube piezo scanner. The X-Y piezo directions raster scan the sample surface, while the Z displacement of the piezo keeps the imaging force consistent.
This synchronised X-Y-Z movement produces a high resolution topography map of the surface. The error in the actual load supplied to the sample relative to the set-point (measured by the transducer) is the gradient image. Topography images are useful for physical measurements of the surface, while gradient images are usually more visually clear.

How in situ SPM works: A high precision 3 axis piezo scanner moves vertically to record the topography signal. A capacitive transducer passively measures error in the set-point, generating a gradient image.
Benefits of In-Situ
Top-down in-situ SPM is highly versatile, and can be used to test most sample locations, sizes and geometries. Multiple samples can be tested using automated routines, without user intervention.
In contrast to nanoindentation systems that raster the sample, top-down imaging can accommodate a variety of samples easily without modifying imaging feedback parameters. In-situ SPM also overcomes the limitations of parallel imaging techniques, which are spatially limited by optical resolution or the positioning accuracy of motorised stages.
Customisable Imaging
Scan size and image resolution are fully customisable to suit each individual sample. By adjusting the scan dimensions and/or resolution, images can be generated in a significantly shorter time. X and Y scan resolution can be set for either a fast survey of the surface (64 x 64 low resolution mapping) or highly detailed imaging (4096 x 4096 high resolution mapping). Customisable X-Y scan dimensions also enable high aspect ratio surface features to be imaged with maximum pixel densities.
With Bruker Hysitron’s Triboview image analysis software, you can easily create publication quality images minutes after they are acquired, using enhanced colour pallets.
Specifications
- Minimum imaging force: <70nN
- Scan rate: 0.01Hz – 3.0Hz
- Fast resolution: 64 x 64
- High resolution: 4096 x 4096
- Maximum X, Y scan size: 75μm x 75μm
- Maximum Z scan size: 5μm
- Tip positioning accuracy: ± 10nm

TI 980 TriboIndenter
SPM+ is a feature of the Bruker Hysitron TI 980 TriboIndenter, the most advanced nanomechanical and nanotribological test system:
- Nanoindentation — hardness, elastic modulus, creep, stress relaxation, fracture toughness, high-speed property mapping
- Nanotribology — thin film adhesion, friction coefficients, scratch/mar resistance, reciprocating wear
- SPM imaging — topography and gradient imaging, nanometre-precision test positioning, friction force imaging
- Dynamic nanoindentation — continuous hardness and modulus depth profiling, storage modulus, loss modulus, tan-delta
Blue Scientific is the official Nordic distributor of Bruker Hysitron standalone nanomechanical testing instruments. For more information or a quote, please get in touch:


